Tuesday, September 6, 2011

Summer casual bolero lesson 3

The temperature reached 100 degrees last Saturday in KY, but it's only 57 degrees today. I'm wearing long sleeves in the house. It has been raining since Sunday as well. I'm worried about my garden and hummingbirds.

I'm going to introduce doily brooches and ruffle for the summer casual bolero today.
When I create something, I always think about a few uses on it. For instance, if I make a scarf, I want to use it as a necklace and belt too. I wanted to make the bolero simple so that I could change the bolero's impression with each doily brooch. That means I can wear the bolero with any colored clothes. :)

I made three doily brooches for the bolero.

I enjoyed this sunflower brooch during August.
The brooch is composed of a doily, crocheted sunflower and pineapple patterned leaf.


I used Autumn pink color for this brooch.
The brooch is composed of a doily, two large pom-poms and three stuffed crochet balls.


I used yarn for this brooch, because I wanted to make the brooch suitable for Autumn.
The brooch is composed of a doily, looped yarn, crocheted flower and a metal button.


I'm selling these same brooches and different designed brooches at my Etsy shop, NeIro. :)


To decorate around the edge of sleeves, I used mercerized cotton crochet thread. That means I can make fine stitches. Of course, you may work on the edge with same yarn as the bolero or you may sew different materials on the edge such as ribbon or lace. I worked on the edge with a ruffle pattern.  The reason I like to use different materials in a project is that the project looks more detailed and fashionable. :)


How were the summer casual bolero lessons? You became interested in making yours?
I'm still thinking of what lesson I teach in my blog next time. If you have any suggestions, please feel free to leave your comment. :)

Thursday, September 1, 2011

Summer casual bolero lesson 2

Hi everyone! How are you doing? I have been busy working for my Etsy shop and my garden. I'm so sorry that the second lesson of the summer casual bolero is really late. However, if you learn these bolero lessons, you will be able to make bolero for all seasons. :)

All right, I'm going to teach you how to sew to make sleeves and how to add neckline to the body.

How to sew to make sleeves

★First, you need to determine how many stitches you want to sew for a sleeve.
I sewed 14 stitches on each sleeve. To make just the right size for yourself, stick some clothes pins where you want to sew ( both sides ), and wear the bolero carefully to make sure the sleeve length is right. 


I like to use this tool instead of the clothes pin.→ 
You can use it for counting stitches as well. :)


If you feel the sleeves are tight, you need to make the body part a little wider before you work on the sleeves.

★When I sew two pieces together, I use slip stitch or single crochet.
Which stitch I use depends on project. You know that single crochet is higher than slip stitch. Since I wanted to make thin sleeves for the bolero, I chose slip stitch. 
※I'm sorry to use different yarn to show you how to sew.

Sew with slip stitch from white to blue with facing inside sleeve.


 Turn the sleve inside out, (see below).


At the first stitch and last stitch, where clothes pins are pointing, thread yarn through each stitches one more time to make it sturdy. Weave the beginning and end of yarn.
Sew the other side too, and then the sleeves are done. :)
How to add neckline to the body part.

★Determine how many stitches you need for the neckline.
I added the neckline from the right armpit through shoulders to the left armpit, because I wanted to make this bolero simple. If you want to make your bolero gorgeous, you may add neckline all around the edge (the blue line in the picture).


When you use different patterns such as a ruffle, trim or lace for the neckline, you should know how many stitches the patterns need on the neckline.

I used puff stitches for my neckline.  The pattern needs multiples of 2 stitches, so I determine that I need 104 stitches. That means 52 stitches on each side. Find the center ( Pink marker ) on the neckline, and divide 104 stitches on both sides of  the neckline ( Blue markers ) like this picture. ↓


★Work puff stitches on the neckline
Puff stitch patter 
Puff St [Yo, insert hook in designated st and draw up a lp] 4 times, yo and draw through 8 lps on hook, yo and draw through rem 2lps on hook
Slip knot, attach yarn with slip stitch in the stitch where blue marker is. Which side you will start from doesn't matter in this pattern. :)
Row 1: *Ch 3, 1 Puff st in next st, ch 1, rep from *, end 1 puff st in last st. Turn.
Row 2: *Ch 3, 1 Puff st in next st, ch 1, rep from *, end 1 puff st in turning ch-sp. Turn.
Row 3 and Row 4 Rep row 2. Fasten off.

When you work the puff stitch pattern around sewed sleeves, don't think it's difficult! Image the neckline is just round line. :)

Now, the bolero base is done!!! Making bolero is easy, isn't it? Since you took my bolero lessons, you can be able to make different designed bolero based on this pattern. :) 
I'm thinking of making my cold season bolero soon based on this pattern. You will see how easy changing the design can be. 

In the third summer casual bolero lesson, I'll present how to decorate the bolero. :) I'll absolutely post the lesson soon. See you next time!


Wednesday, July 20, 2011

Summer casual bolero lesson 1

Hi everyone! I've completed making my bolero pattern! I'm going to teach you how to make this bolero in three lessons.


I designed this bolero to be easy to make because I wanted to be able to easily change it's appearance by adding different brooches that I made.  I made three brooches, so I'll introduce them to you in the last part of bolero lesson.


I used four balls of Eco-cotton yarn for the bolero.


For the first, I'm going to tell you about this bolero's structure.
Bolero is composed of three parts: body, sleeve and edge (neckline). I just created two parts, body and neckline, in my pattern. 


How to make
Make foundation chains for the body.
You need to measure the length from your left arm pit, behind your neck then to your right arm pit.


Mine was 21"(XS in US size). I added 2 1/2" on both sides for the sleeves. The total length was 26". I made 100 chains for 26". I used textured single crochet stitch for body, so I needed to add 3 more chains.


Determine the width of body part.
You need to measure the length of your arm around arm pit. To make room in sleeves, I recommend that you measure the length while wearing clothes.


Mine was less than 11", so I worked 50 rows of textured single crochet stitches.


I'm going to explain about textured single crochet stitch here.
You need to work 2 single crochet in a stitch, and skip the next stitch, work 2 single crochet in the next stitch. You need to repeat that.
Row 1: 1 sc in third ch from hook, *skip 1 ch, 2 sc into next ch, rep from * to last 2ch, skip 1 ch, 1 sc into last ch, turn.
Row 2: Ch 1 (counts as first sc), 1 sc in first sc, *skip 1 sc, 2 sc into next sc, rep from * to last 2 sts, skip 1sc in top of the turining ch, turn.
Rep row 2 for your width!


In the second lesson, I'll teach you how to sew to make sleeves and how to add the neckline to the body part.
See you next time! :)

Tuesday, July 5, 2011

Summer event with Yukata 2011

Do your countries have any events in the summer? In Japan, there are many summer festivals. Young Japanese girls like to wear traditional summer costume called Yukata at the festivals. Yukata is more casual than Kimono, and it's easier to wear than Kimono.
I love Yukata, so I brought my Yukata to the U.S, but I haven't have an opportunity to wear it.
You know that I'm trying to use Japanese culture in my crochet projects as I mentioned before. I'm going to try that with Youkata this time!!

Here's my Yukata style of this year.


I made three different lengths of trim, and sewed one inside neckline, placed one on the bow of the Obi (belt) when I tied the Obi, and made a flower with the last one as a decoration for the Obi. 


Now a days, Japanese Kimono companies are presenting a new Yukata style. I'm glad about their new tries. I hope foreign country people become interested in Yukata. :)

To join the event, please visit Etsy Japan team page or Facebook page.
You may attach links or comments to this article as well. Feel free to join the event! :)

 P.S. I'm going to receive only three custom orders of my crochet Yukata item. It's composed of a neckline trim, a belt trim and a flower decoration. I sell this item for only Etsy Japan team members and my blog followers. Eleven colors, white, cream, beige, peach, pink, violet, burgundy, red, yellow, light blue, and blue are available. The price is $20. Shipping cost depends on destination.
If you are interested in the item, please let me know which color and when you will need it by in the “contact” section at my shop. After I complete making yours, I'll list it as your custom order at my shop.

Thursday, June 30, 2011

Summer wreath : Lesson 3

This time is last part for making the summer wreath. I'm going to decorate the base in this lesson with some crocheted items that I made.
First, I'm going to show you my decoration items.


I prepared two kinds of crochet trim ribbons, two different size of doilies, a button, a couple of crocheted birds and two thin dried branches. If you would like to make these birds, you can get the pattern here. You may use anything you want as a decoration.
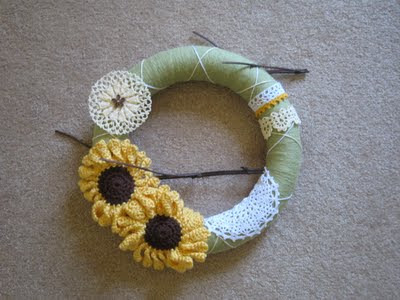
I forget to tell you how to attach the sunflowers on the base in the lesson 2. I used glue for that, because it's easy, and I'm not going to sell the wreath. If I make the wreath for selling in my shop, I will sew all decorations onto the base. Sewing is sturdier than gluing.

First, I'm going to attach a larger doily to the base like this.


Next, I'm going to attach a smaller doily with the button.


Next, I'm going to attach two kinds of trim ribbons.


Next, I'm going to attach two dried branches as a perch for the two birds. By the way, these branches are of Japanese basil that I grew last summer.  The plant completely dried up last fall, so I cut it into lengths about 10 inches long, and saved them as craft material. I love to use materials from the nature.


At the end, place two birds on the branches, then hang the wreath from the front door!!
Here is my summer wreath. ❤


Thank you for joining my lessons until the end. If you make your wreath, please let me know. I'd like to introduce your wreath on my online shop's Facebook page!
I'm already thinking of next lesson. I will make a bolero. I know that a lot of Etsy sellers are selling their wonderful boleros. Those boleros look difficult to make, but I guess the pattern is easier than people think. After I create my original pattern, I'll start my "how to make a bolero" lesson. :)

Thursday, June 23, 2011

Summer wreath : Lesson 2

Hi everyone! I'm going to teach you how to make sunflower for the wreath in today's lesson.
Here is the sunflower. ↓↓↓


I'll attach two sunflowers to the wreath.
First, let's learn crochet abbreviations! It's important to read directions. 
  • ch ---------- chain
  • st/sts ------- stitch/stiches
  • sl st -------- slip stitch
  • sk ---------- skip
  • sp ---------- space
  • rep --------- repeat
  • beg -------- beginning
  • blp -------- back loop
  • flp --------- front loop
  • sc --------- single crochet
  • dc -------- double crochet
 
I started learning crochet since I moved to the U.S from Japan, so I learned crochet with American directions. Learning abbreviations was not hard, but I still have a hard time to understand directions exactly. By the way, I'm not confident to teach crochet in Japanese, because I don't know Japanese names of each stitches.
Most directions use common abbreviations, but describing hook movements is a little different in each book. I'd like to talk about such descriptions in this blog sometime.

All right, I'll write a direction for the sunflower from here with pictures. 

[How to make sunflower]

Use brown colored yarn.
Rnd 1: Ch 3 (count as 1 dc), 1dc 11 times in the third ch from the hook, join with a sl st in top of beg-ch-3, turn. 12 dc made


Rnd 2: Ch 3 (count as 1 dc), 1dc in first dc (which is ch 3 is standing in), 2dc in each dc around, join with a sl st in top of beg-ch-3, fasten off. 24 dc made


Petals
Attach yellow colored yarn with sl st at any 1 dc of rnd 2.


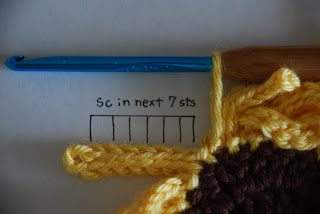
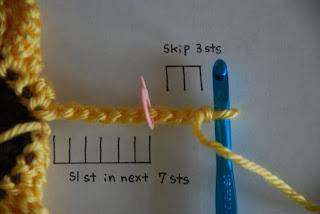
Rnd 1: *Ch 10, sk 3 ch sts, sl st in next 7ch sts on reverse of the ch, sl st in next dc of rnd 2, rep from *around, join with a sl st in first ch.


Rnd 2: *sc in next 7 sts (blp only), [sc, ch 3] in the corner sp, sc in next 7 sts (blp only), rep from * around, join with sl st in first sc.


1 petal is made.

Now, I've made two sunflowers! I'm going to use the flowers like this.


Next lesson will be last lesson for the wreath. I'll complete the wreath decorations, and you'll see my completed summer wreath!
See you next time.♪

If you have any questions for this lesson, please feel free to leave comment. I'm happy to answer you. :)

Thursday, June 16, 2011

Summer wreath : Lesson 1

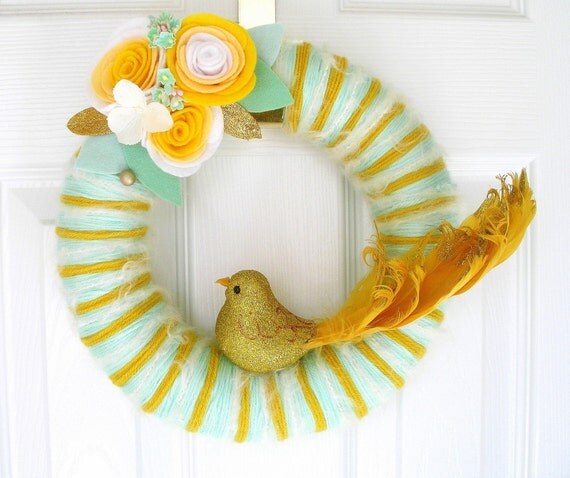
Hi there, I start posting how to make my summer wreath. First, let me introduce an Etsy shop. She is selling beautiful wreaths using yarn!
knock.knocking

It's a pretty wreath, isn't it? I'm going to make my summer wreath like hers.

[PREPARATION]


I used these yarn, fleece and a 12" round Styrofoam shape. These yarn are mostly left over from my other projects. :)
I used the fleece to make the Styrofoam shape thicker
Green, white and cream colored yarn are used for the wreath's base color. (Cotton yarn)
Yellow and brown colored yarn is for a sunflower as decoration.
*I'll add other items to decorate the wreath later.


[HOW TO MAKE] 

Cut enough fleece to make five yards about 2" wide.


 ★Surround the Styrofoam with fleece to make the shape thicker.


 ★Coil yarn around the wreath.
     Work on one side to make sure the yarn is wound close together so the fleece doesn't show through.
    

Use glue to fasten the yarn on the back of the wreath.


Add white and cream colored yarn. Fasten to the back with glue.


Now the base of the wreath is completed! In the next lesson, I'll post how to make a sunflower. In the last lesson, I'll decorate the base with the sunflower and other items that I'll make!
See you next time. :)